

On this page
GitHub Pages ships with a github.io subdomain out of the box, which is fine for a personal project but reads as a draft the moment someone else sees it. Pointing a real domain at it takes about ten minutes of DNS work and a single field in the repo settings.
Prerequisites
Before you start, you’ll need:
- A GitHub account.
- A repository that already has GitHub Pages enabled.
- A custom domain you’ve purchased from a registrar.
Add your custom domain in GitHub
In your repository, go to Settings → Pages and add your domain under the custom domain field. GitHub will start a DNS check in the background. It’ll fail at first, which is expected, because the DNS records don’t exist yet.
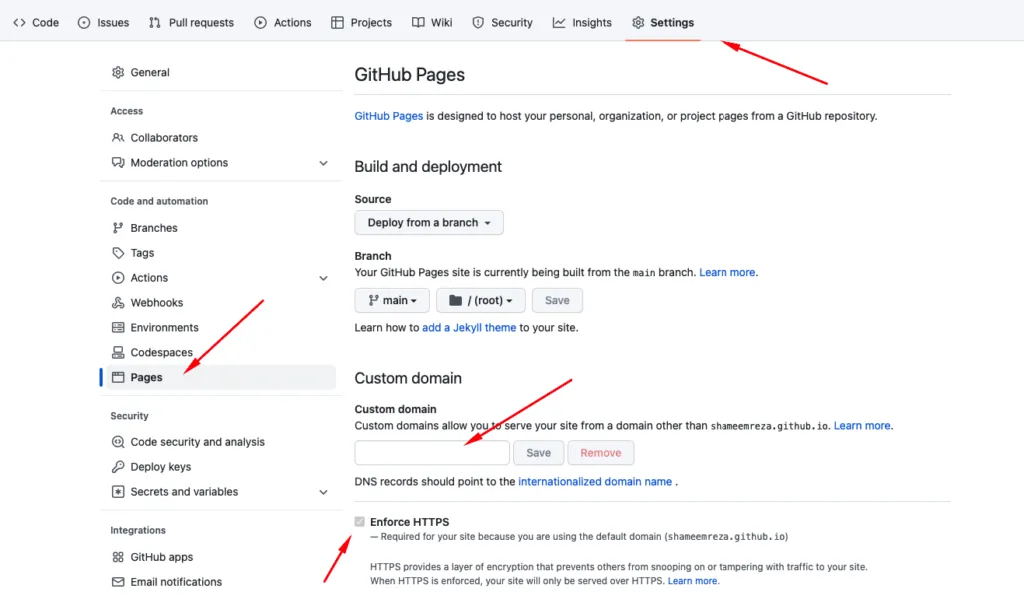
Add A records and a CNAME at your DNS provider
GitHub Pages uses four static IPs for apex domains. Add an A record for each one on your root domain (@):
185.199.108.153
185.199.109.153
185.199.110.153
185.199.111.153
Then add a CNAME record for www that points to <username>.github.io (replacing <username> with your GitHub username, or the org name if the repo is owned by an org).
Always cross-check the GitHub Pages custom domain docs for the current IPs. GitHub has rotated them in the past.
Registrar-specific steps
The DNS records above are the same everywhere. Only the UI changes between registrars. Here’s where to find DNS settings at a few common ones.
GoDaddy
- Log in and open your domain.
- Go to DNS Management.
- Add the four
Arecords listed above. - Add a
CNAMEwith Host:wwwand Points to:<username>.github.io. - Save.
Namecheap
- Log in and open the domain.
- Go to Advanced DNS.
- Add the four
Arecords listed above. - Add a
CNAMEwith Host:wwwand Points to:<username>.github.io. - Save.
HostGator
- Log in and open the domain.
- Go to Advanced DNS.
- Add the four
Arecords listed above. - Add a
CNAMEwith Host:wwwand Points to:<username>.github.io. - Save.
Wait for DNS to propagate
DNS changes take anywhere from a few minutes to 24 hours to propagate. You can track it with DNSChecker, which shows how the records resolve from different locations around the world.
Once it’s propagated, GitHub’s DNS check will turn green and the Enforce HTTPS checkbox will become available. Turn it on. Your domain is live.

Shameem Reza Happiness Engineer at Automattic
I fix WooCommerce problems for a living and review plugins for WordPress.org. Every fix here is tested on a clean site first.



No comments yet. Ask the first question.